Setting Up Animal Fields
In this document we will walk you through setting up animal details on a lot: why you'd want to collect them, how to turn the feature on, how to decide which questions to ask, and what the finished setup looks like both to a guest booking online and to you (or your staff) on a reservation.
This assumes you already have the lot you want to set this up on. Animal accommodation settings are configured per lot, so a seasonal RV site and a tent site can ask completely different questions, or none at all.
Why set this up?
Every reservation already has an animal count, whether you configure anything here or not: a guest says how many pets they're bringing, and that's it. Animal Fields let you go further and ask about each one, right at the point of booking, for example:
- A campground with breed restrictions asks for Breed and Weight, so a booking that violates the policy is flagged before check-in instead of discovered at the gate.
- A campground that requires proof of vaccination asks a Vaccinated yes/no question and a Last Vet Visit date, so front desk staff know at a glance what to check for on arrival.
- A campground that just wants a heads-up asks a free-form Notes field, e.g. "anything staff should know, like a nervous rescue dog."
None of this is required. A lot with no animal fields configured still lets guests bring and count animals, there's simply nothing further asked about them. Everything below is opt-in, one lot at a time.
Where to find it
Animal settings live on the lot itself:
- Go to the Lots menu.
- Double-click the lot you want to configure. This opens the Lot dialog.
- Click the Accommodations tab.
That's the tab we'll use for the rest of this walkthrough. (The same visibility toggle also appears on the Online Booking tab, alongside the other checkout options, covered in Step 1 below.)
Step 1: Turn it on
On the Accommodations tab, next to Max Adults and Max Children, you'll find Max Animals: the most animals a guest can add to one reservation on this lot. Set this first, it's always enforced, whether or not you ask anything further about those animals.
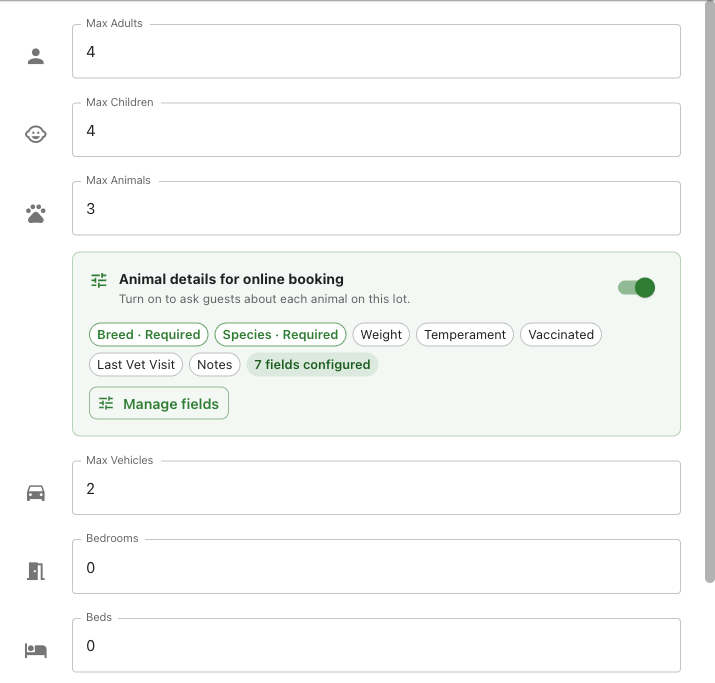
Directly below it is a summary card for the animal details setup, with a Display the animals section switch:
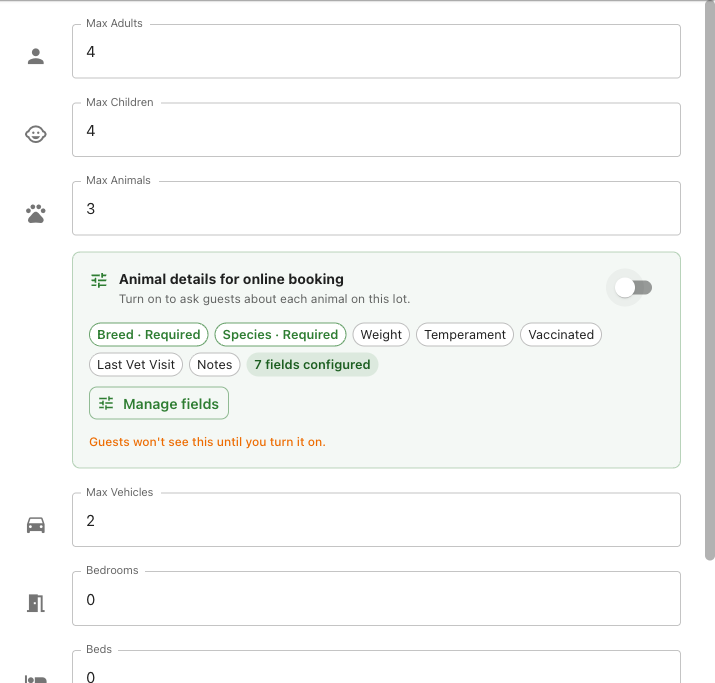
- Off (the default): guests entering a booking online still say how many animals they're bringing, but aren't asked anything else.
- On: guests also answer the questions you configure in Step 2, one set of questions per animal.
This switch only changes what guests see on the online booking page. You and your staff always see the full details screen on a reservation regardless of this setting, covered in What you and your staff see.
Note
The same switch appears a second time on the Online Booking tab, under Online Checkout Options to Display, since that's where campground owners usually look for anything guest-facing. Flip it from either spot and the other one updates too, there's only one setting underneath.
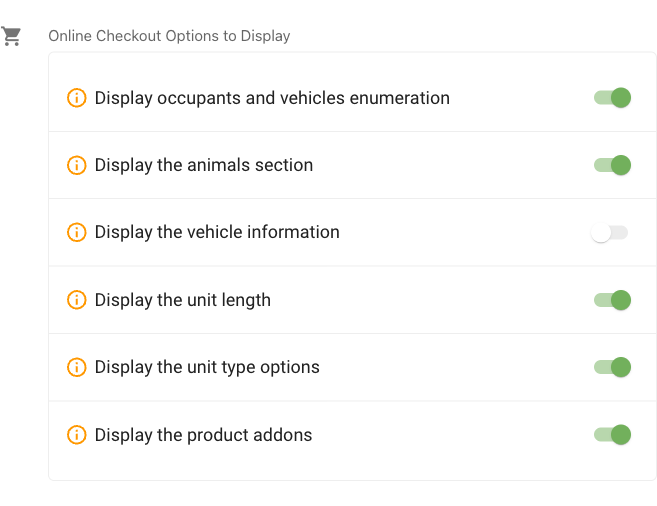
If you have questions ready to configure but aren't ready to collect them from guests yet, leave the switch off and do Step 2 anyway: Manage fields works either way, so you can build the whole thing out ahead of time and flip the switch on when you're ready.
Step 2: Decide what to ask
Back on the animal details card, click Manage fields. This opens the Animal Fields Setup dialog, where each field you add becomes one question guests answer per animal.
Let's build a small, realistic example: a pet-friendly RV park that wants a breed, whether the pet is vaccinated, its weight, and an optional note.
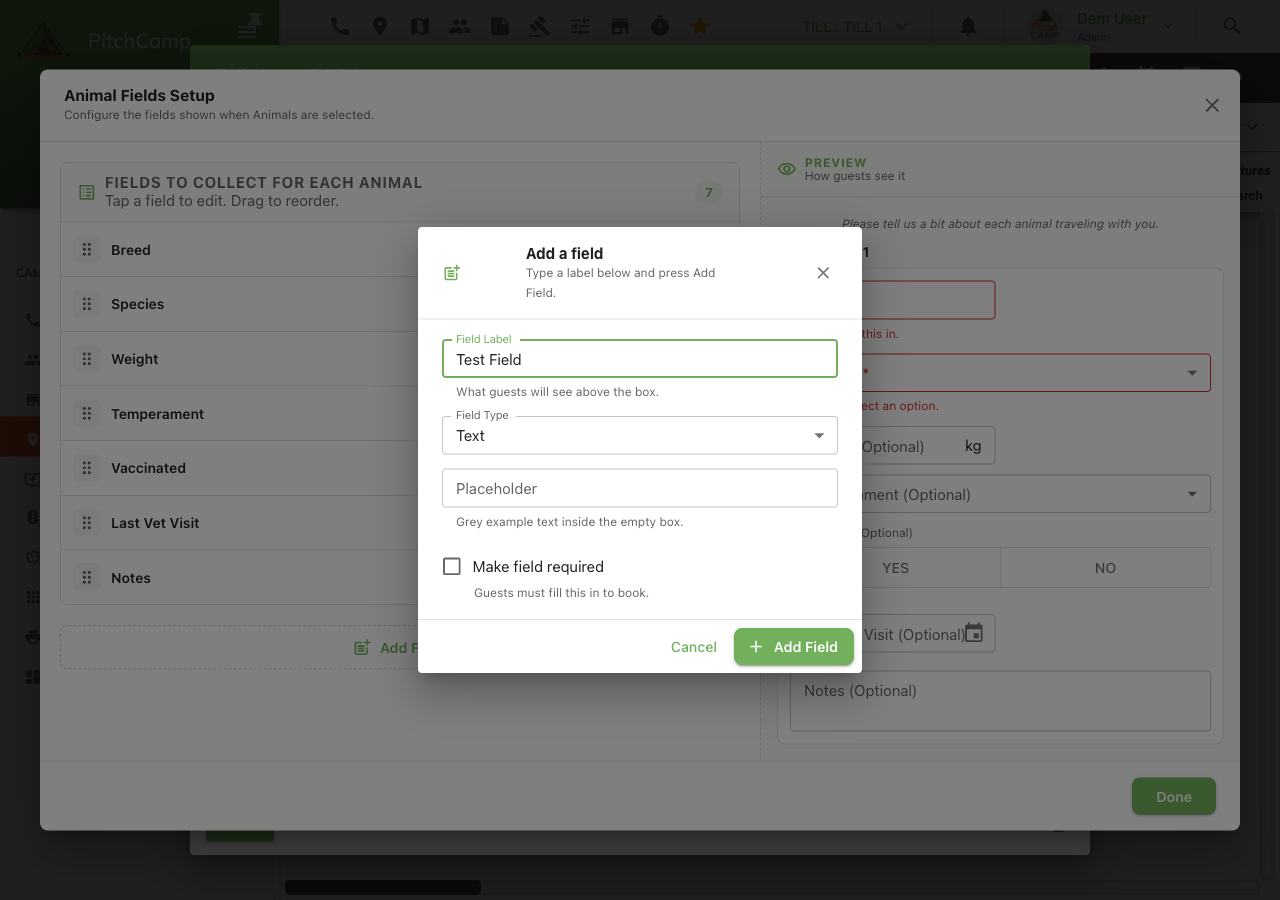
- Click the dashed Add Field button below the fields list. A small popup opens for one new field at a time, so the list itself never gets cluttered while you're still deciding.
- Type a label, for example "Breed", and optionally a placeholder hint guests see before they've typed anything.
-
Pick a Field Type. This is the part worth slowing down on, since it decides how guests answer:
Field Type What guests see Example use Text (default) A single-line text box Breed, typed freely as "Labrador" Dropdown (Select One) A list of choices you define, pick exactly one Species: Dog / Cat / Other Dropdown (Select Multiple) A list of choices you define, pick any number Temperament: Friendly, Calm Number A numeric box, with an optional unit shown after the value Weight, reading "4.5 kg" Date A date picker Last Vet Visit Yes/No A toggle for a two-answer question Vaccinated Text Area A multi-line box for longer free text Notes Either dropdown type reveals an Options editor: type a choice, press Add Option, repeat. At least one option is required before saving. Number reveals a Unit field instead, so you can label the value without guests having to type it themselves.
-
Turn on Make field required for anything a guest shouldn't be able to skip, for example Vaccinated on a campground with a strict pet policy. Required fields show guests a red asterisk; everything else is marked (Optional). Leave it off for anything genuinely optional, like Notes.
- Press Add Field in the popup to save it and close the popup, or Cancel to discard it. Repeat for each question, then drag to reorder using the handle on the left of each row, this is also the order guests and staff see them in.
For our example, that's four fields: Breed (Text), Vaccinated (Yes/No, required), Weight (Number, unit "kg"), and Notes (Text Area, optional).
Step 3: Preview before you turn it on
As you add fields, the live preview on the right of the dialog updates immediately. It's not a mockup, it's the exact same form your guests will fill in, so what you see there is what ships. A dropdown of either kind, or a Text Area, always takes a full-width row; shorter fields like Text, Number, Date, and Yes/No sit two to a row when there's room. Use the preview to sanity-check the order and grouping before turning the visibility switch on.
What your guests see when booking online
Once Display the animals section is on and a guest books a lot with fields configured, they see one of these sections per animal they've counted, in the order you set:
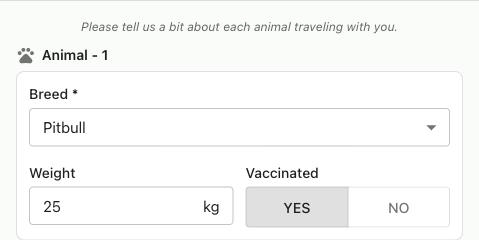
A required field left blank stops checkout from completing, with the same inline validation you saw in the setup dialog's preview. Nothing here is optional to see, only some fields are optional to answer, based on how you configured them in Step 2.
What you and your staff see
On the Occupants & Details panel of a reservation (Step 4 of New Reservation, or the Occupants section of Reservation Edit), an animal count above zero brings up a Details Summary card automatically:
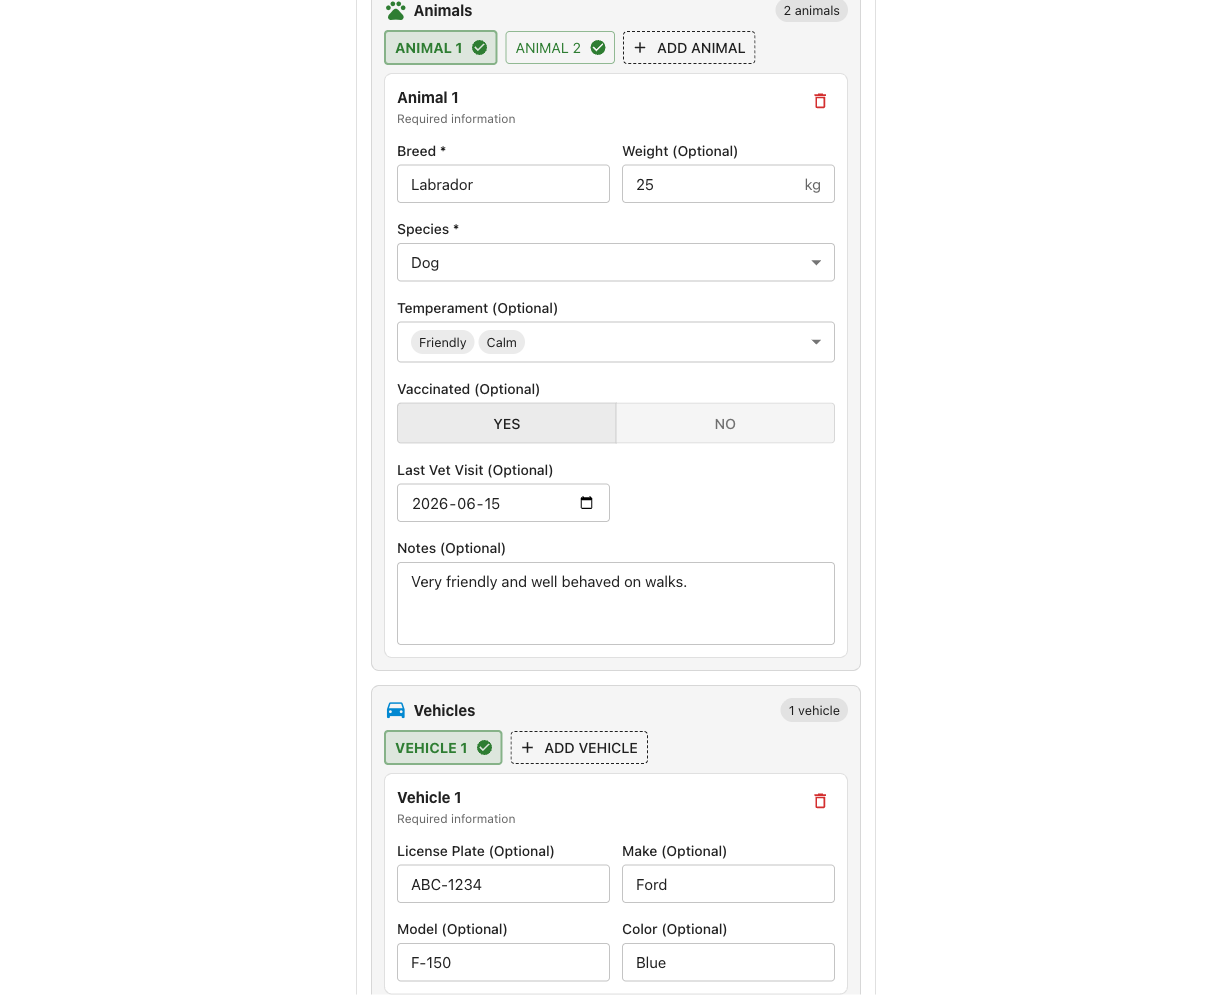
- One small button per animal ("Animal 1", "Animal 2", ...), green with a checkmark once every required field is filled in, amber with a warning while something required is still missing.
- Clicking a button shows that animal's fields below it, the same questions guests answer online, so staff booking by phone or walk-in fill in exactly the same information.
- A banner pinned to the bottom of the card flags any animal still missing a required field, with a Review button that jumps straight to it.
This view is always available to staff, whether the online guest-facing switch is on or off. Turning that switch off only hides the questions from the online booking page, it never hides anything from you.
Changing your mind later
You can edit a lot's fields at any time, even after reservations already have answers stored. The dialog checks first if a change could affect existing data (changing a field's type, removing a dropdown option a reservation already picked, or deleting a field outright) and tells you how many reservations are affected before you confirm. Nothing is silently lost: an answer that no longer matches its field's current setup is flagged instead of hidden. Full details, including exactly what a flagged or historical answer looks like on a reservation, are covered in Animal Accommodation and Occupants & Details.
Charging for animals?
Animal Fields are purely about collecting information, they don't set a price. If your campground charges for animals beyond a certain number, that's a separate setting: Admin > Extra People, on the row labeled Animal. It uses a High Water Mark (how many animals stay free before a charge kicks in) and either a fixed or tiered price for each one after that, the same way Extra People pricing works for adults, children, and vehicles. It reads the same animal count guests enter during booking, so the two settings work together without any extra setup on your end. See Additional Occupants Panel for how to configure it.
See also
- Lots Overview: Animal Accommodation, the full settings reference for everything covered here.
- Occupants & Details (Animals, Vehicles), the complete reservation-side flow, including what happens when a field's setup changes after a reservation has already answered it.
- Additional Occupants Panel, for charging per animal.