Campground Settings
The Campground Settings area allows you to control key parameters that shape how your admin interface behaves. Use these settings to customize rules, alerts, and system preferences to match your campground’s operations.
Accessing the Campground Settings
- Open up you navigational menu and expand the Admin menu.
- Then select Campground Settings.
- And click on the Campground Settings tab.
-
Note: you might need to scroll to the right to see the Campground Settings tab.
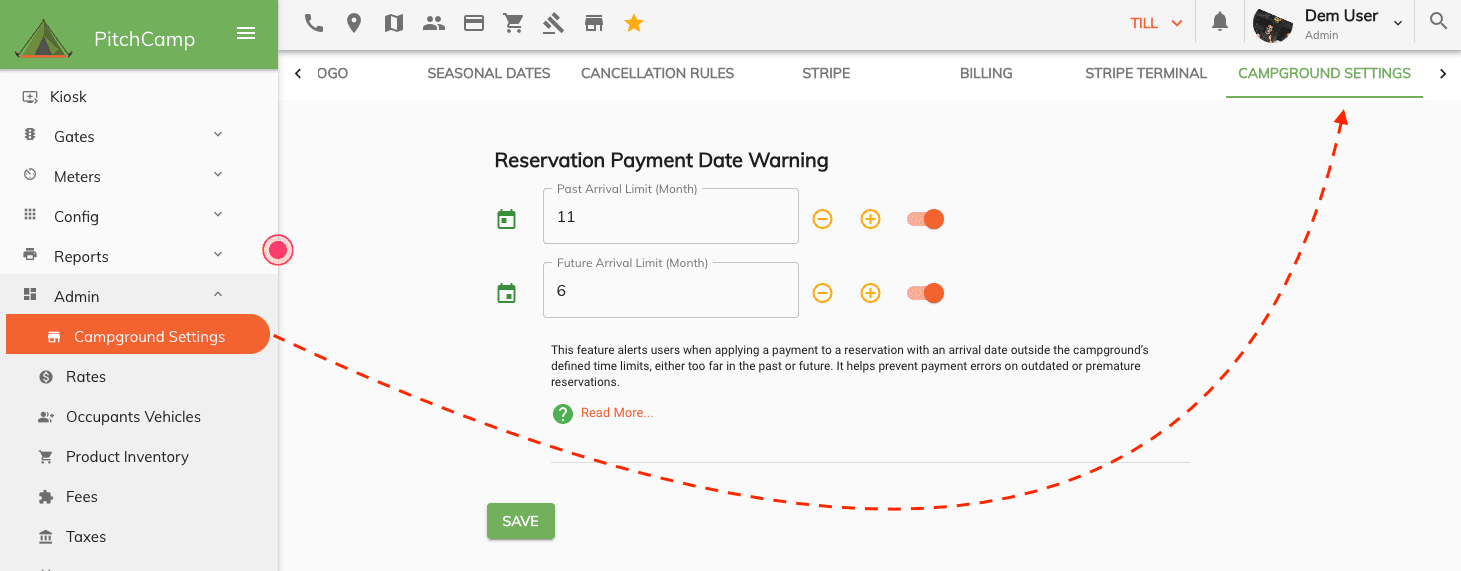
Reservation Payment Date Warning
The Reservation Payment Date Warning helps prevent errors by alerting users when they attempt to apply a payment to a reservation with an arrival date that falls too far in the past or too far in the future.

This feature is controlled by two campground settings:
-
Past Arrival Limit – sets how far back a reservation's arrival date can be before triggering a warning when applying a payment
-
Future Arrival Limit – sets how far ahead a reservation’s arrival date can be before triggering a warning when applying a payment.
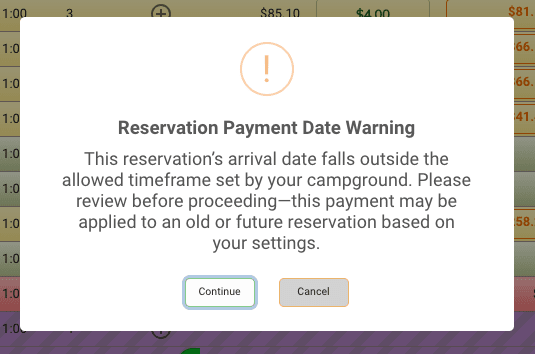
If the Past Arrival Limit or Future Arrival Limit is enabled, a warning will be shown when a payment is applied to a reservation outside the active threshold. If both are disabled, no warning will be displayed.
This ensures flexibility for campgrounds while helping maintain data accuracy when limits are in place.
Note
The warning will still allow users to apply payments to reservations outside the active threshold. It serves as a reminder to double-check the reservation details before continuing.
When and Why to Use This Feature
Example 1: Preventing Errors on Old Reservations
A guest stayed at your campground six months ago, and a staff member accidentally selects the wrong reservation when applying a payment. With the Past Arrival Limit set to 6 months, a warning will appear to let the user know the reservation is older than expected. This helps prevent accidental payments on outdated reservations.Example 2: Avoiding Early Payments on Future Stays
A guest books a site for a stay that's 11 months away, but campground policy only allows payments within 6 months of arrival. By setting the Future Arrival Limit to 6 months, the system warns the user before applying the payment, helping maintain consistent billing practices and errors.
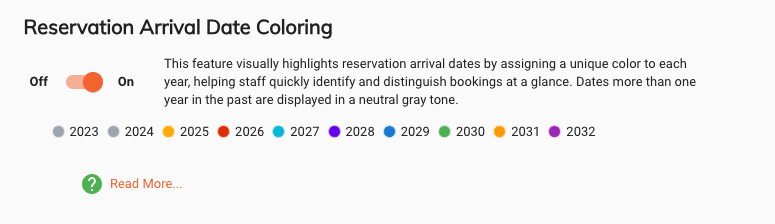
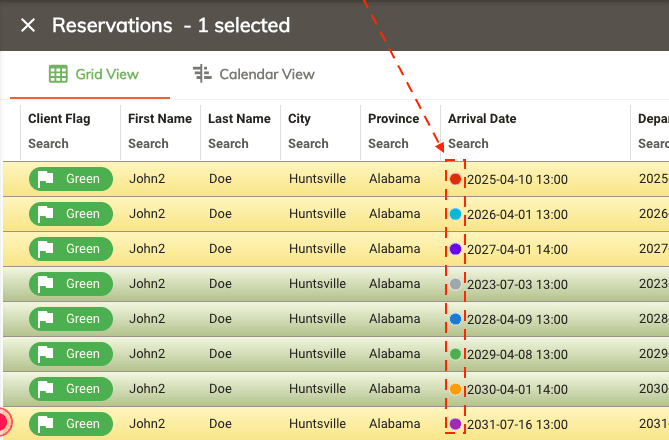
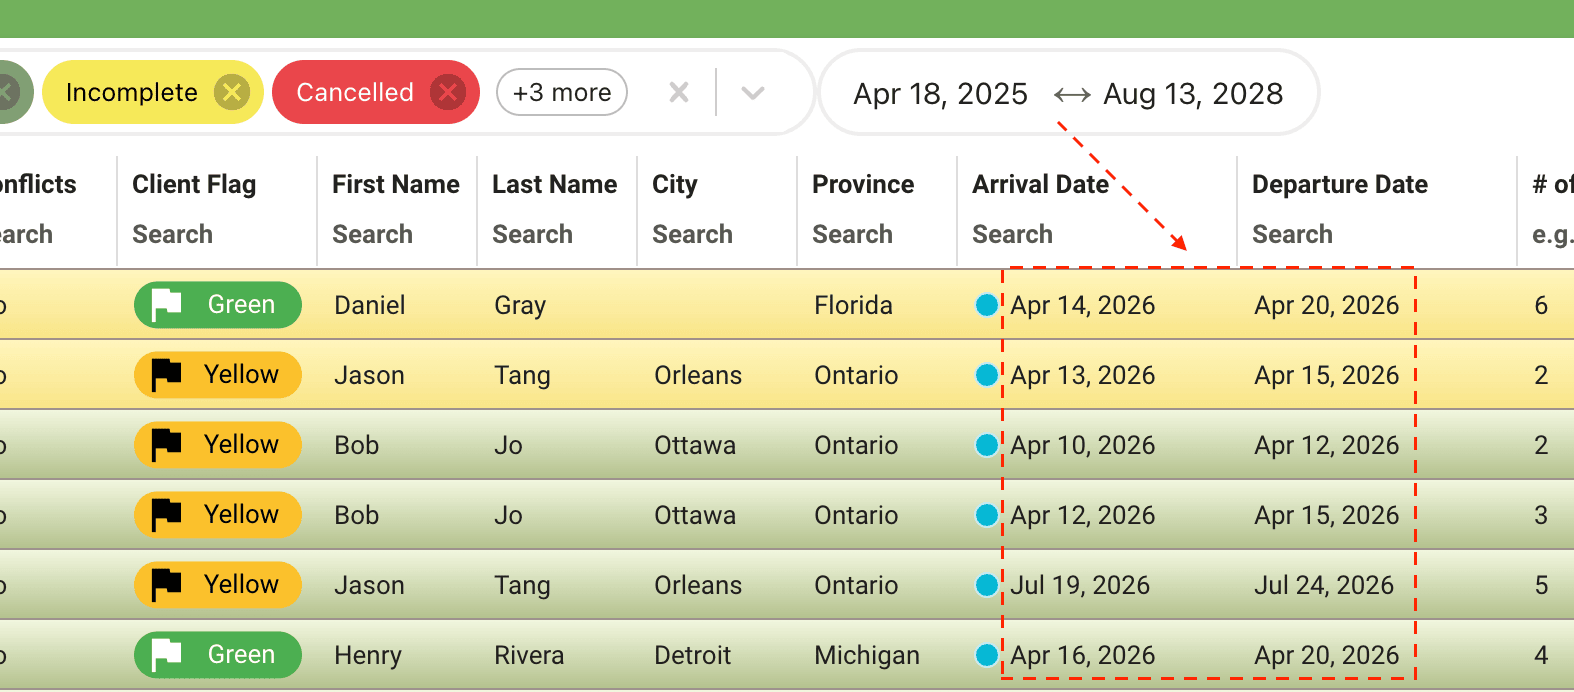
Reservation Arrival Date Coloring
The Reservation Arrival Date Coloring feature visually highlights reservation arrival dates by assigning a unique color to each year, helping staff quickly identify and distinguish bookings at a glance. Dates more than one year in the past are displayed in a neutral gray tone.
When and Why to Use This Feature
Example 1: distinguishing reservations by year A campground has a high volume of repeat guests, and staff need to quickly identify which year a reservation was made. By enabling Reservation Arrival Date Coloring, each year is assigned a unique color, making it easy to spot and differentiate reservations from different years in the reservation grid.
Date Display Format
The Date Display Format setting controls how dates are shown across the application.
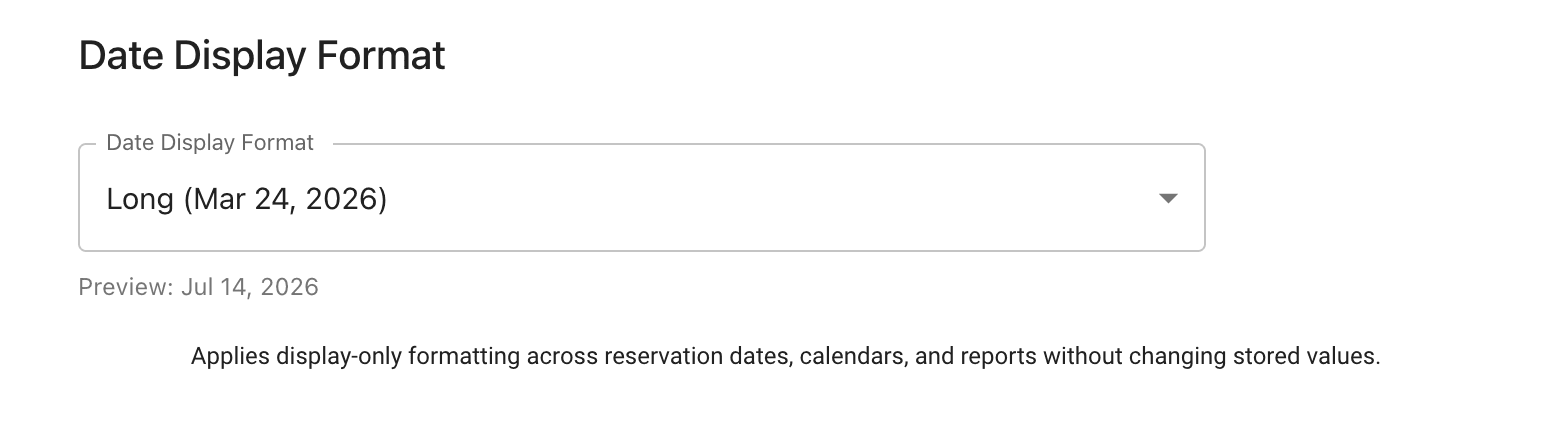
This setting is not limited to the reservation grid. It applies to all areas where dates are displayed, including reservations, POS, reports, and other date-related screens.
Available format options include:
- ISO (example: 2026-03-24)
- US (example: 03/24/2026)
- EU (example: 24/03/2026)
- Long (example: Mar 24, 2026)
- Long with weekday (example: Tuesday, Mar 24, 2026)
- Short (example: Mar 24)
When and Why to Use This Feature
Example 1: Standardizing Date View Across Screens
If your team works in reservations, POS, and reporting throughout the day, using one consistent date format reduces confusion and makes records easier to read and verify.
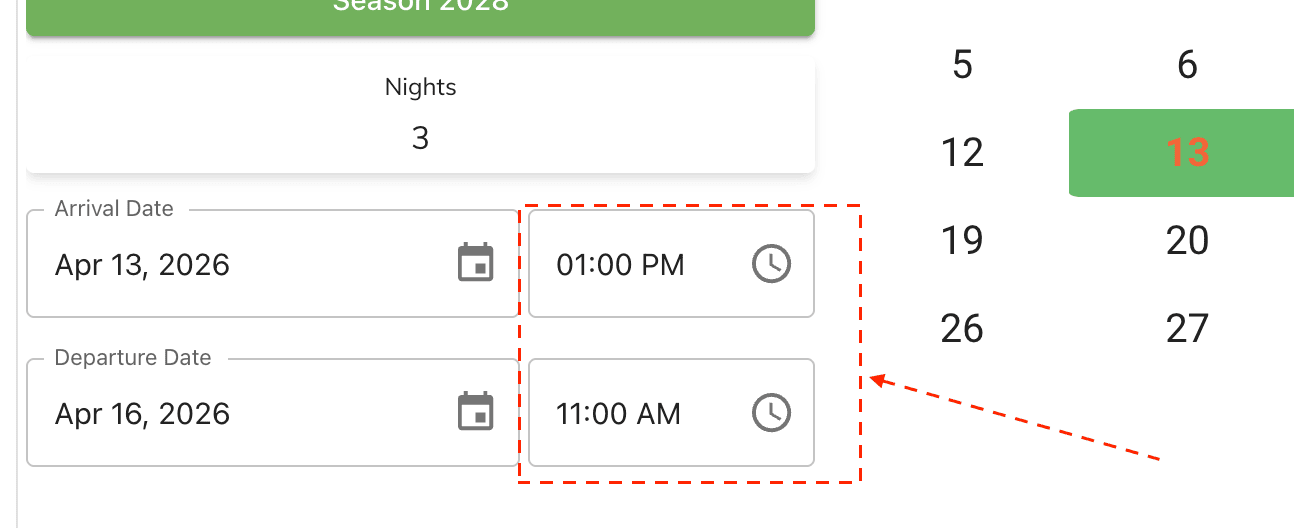
Time Display Format
The Time Display Format setting controls how times are shown throughout the application.

Like date formatting, this setting applies globally and is not exclusive to one module. It affects reservations, POS, reports, and any other area that shows time values.
Available format options include:
- 24-hour (example: 14:30)
- 12-hour (AM/PM) (example: 2:30 PM)
When and Why to Use This Feature
Example 1: Avoiding AM/PM Confusion
Campgrounds that operate on shift schedules often prefer 24-hour time to reduce ambiguity for arrivals, check-ins, and operational tasks.
Global Monthly Setting
The Global Monthly Setting controls how the system defines a "month" when calculating monthly camping rates. This setting applies to all rates across the campground and cannot be configured per individual rate.

Monthly Billing Type
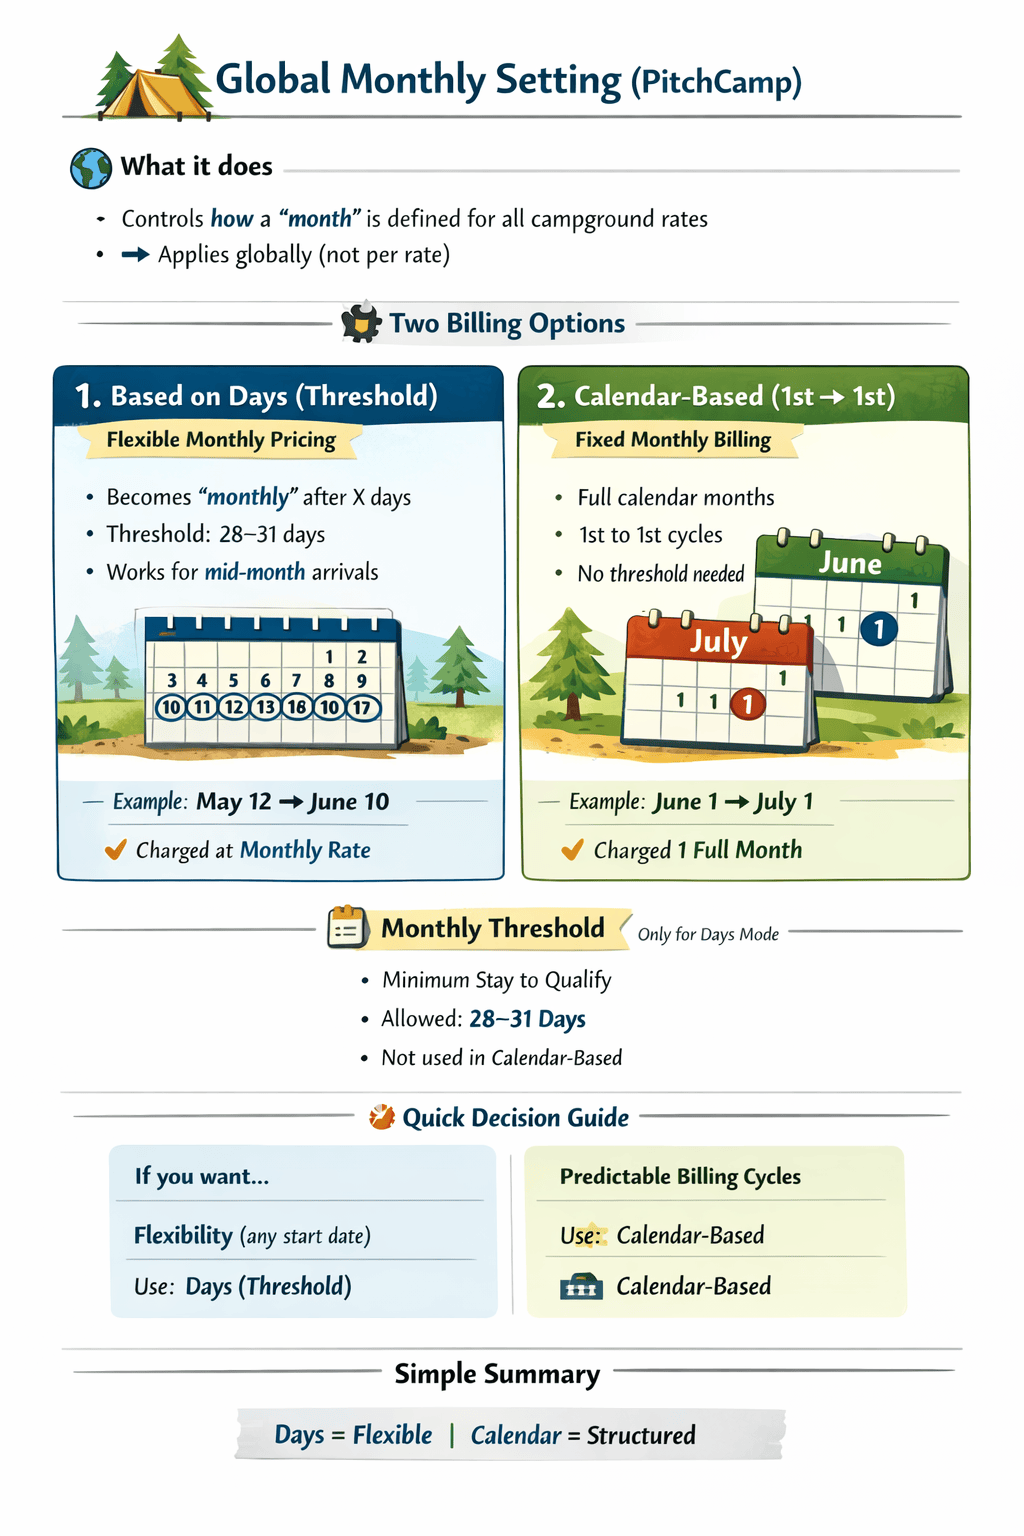
The Monthly billing type dropdown determines how the system counts a month when a reservation qualifies for monthly pricing.
Based on days (threshold)
The system considers a reservation "monthly" once it reaches or exceeds a defined number of days — the monthly threshold. This is useful for campgrounds that want a fixed, consistent rule regardless of which day of the month a guest arrives or departs.
Calendar-based billing (true monthly: 1st to 1st)
The system bills the guest for a full calendar month, from the 1st of one month to the 1st of the next. This is useful for campgrounds that align billing cycles to the calendar and want guests charged consistently on a month-to-month basis.
Monthly Threshold (in days)
The Monthly threshold field is only visible when Based on days (threshold) is selected. It defines the minimum number of days required for a reservation to qualify as monthly.
- Allowed values: 28 to 31 days
Note
The monthly threshold has no effect when Calendar-based billing is selected.
When and Why to Use This Feature
Example 1: Flexible monthly guests (threshold billing)
Your campground accepts guests who arrive mid-month and stay for roughly 30 days. Using Based on days (threshold) with a threshold of 28 ensures these guests are automatically billed at the monthly rate without requiring them to check in on the 1st.Example 2: Fixed billing cycles (calendar-based)
Your campground rents seasonal lots on a month-to-month basis aligned to the calendar. Using Calendar-based billing (true monthly: 1st to 1st) keeps billing predictable and consistent for both staff and guests.
Note
These settings apply globally to all rates. Any change here affects how monthly pricing is calculated across your entire campground.
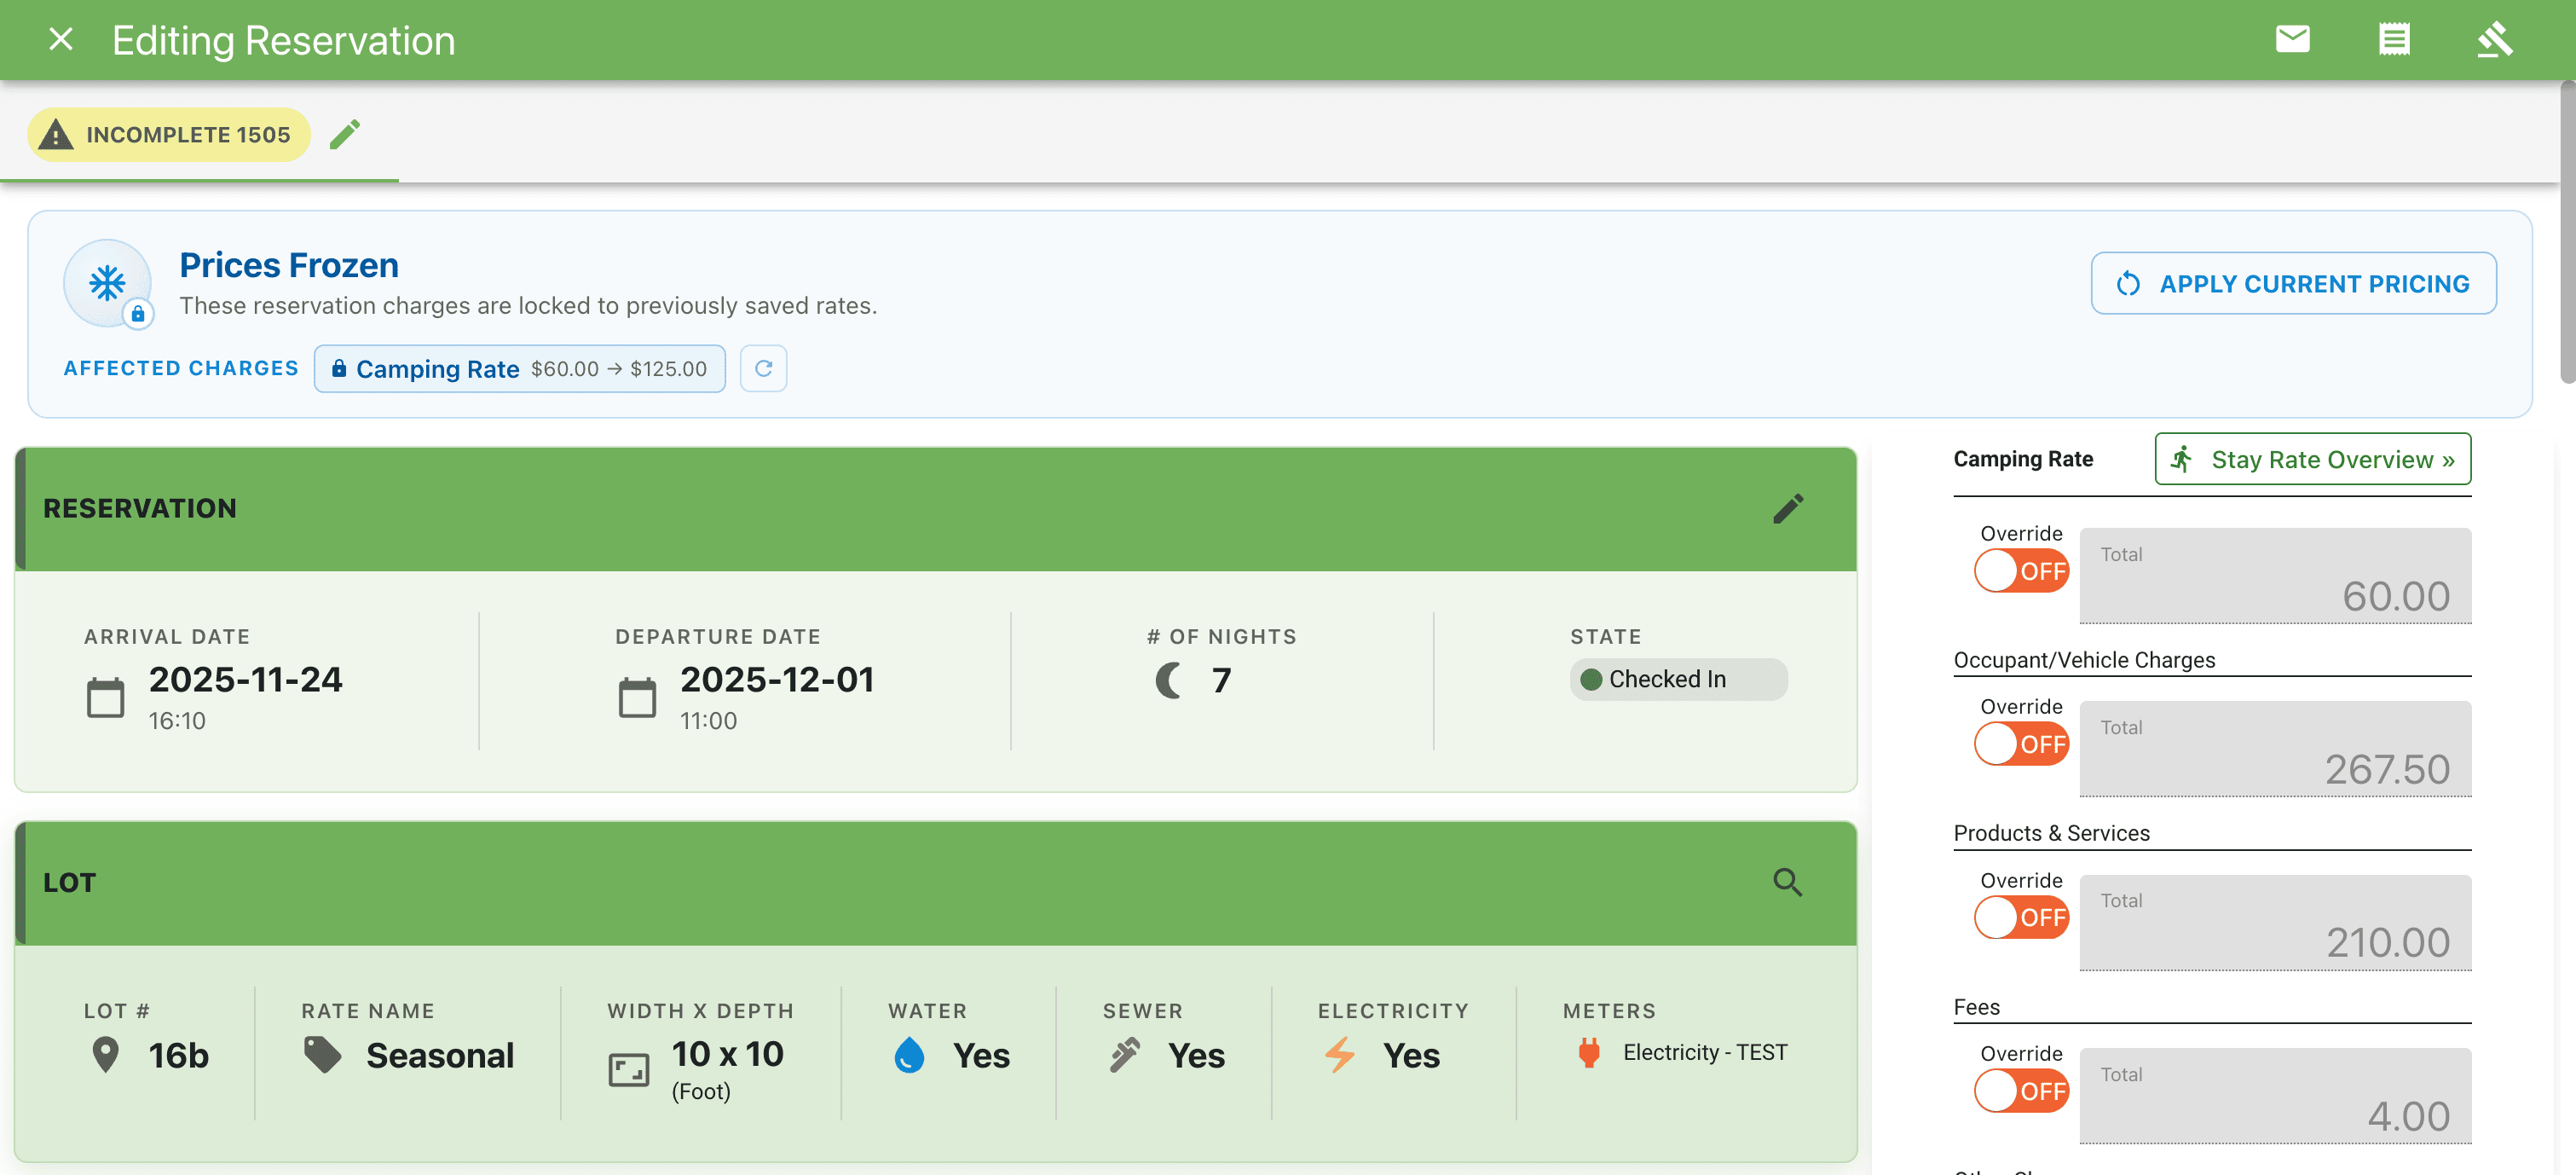
Reservation Frozen Pricing Banner
The Reservation Frozen Pricing Banner notifies staff when a reservation's charges are locked to previously saved rates and the current pricing has since changed. This gives you the option to update the reservation to reflect the new pricing before processing it further.
This setting is disabled by default. When enabled, a Prices Frozen banner appears at the top of any reservation where at least one charge differs from the current rate.
Enabling the Banner
To enable the banner, find the Reservation Frozen Pricing Banner toggle at the bottom of the Campground Settings tab and switch it to On.
A live preview of the banner is shown directly below the toggle so you can see exactly how it will appear on reservations.

How the Banner Works
When the banner is enabled and a reservation has charges that no longer match the current pricing model, the Prices Frozen banner appears at the top of the reservation panel. It shows:
- A list of Affected Charges — each displayed as a chip with the charge name and the price difference (e.g.,
Camping Rate $60.00 → $125.00). - An Apply Current Pricing button to update all affected charges at once.
Applying Updated Pricing
You have two ways to apply updated pricing to a frozen reservation:
Apply all affected charges at once
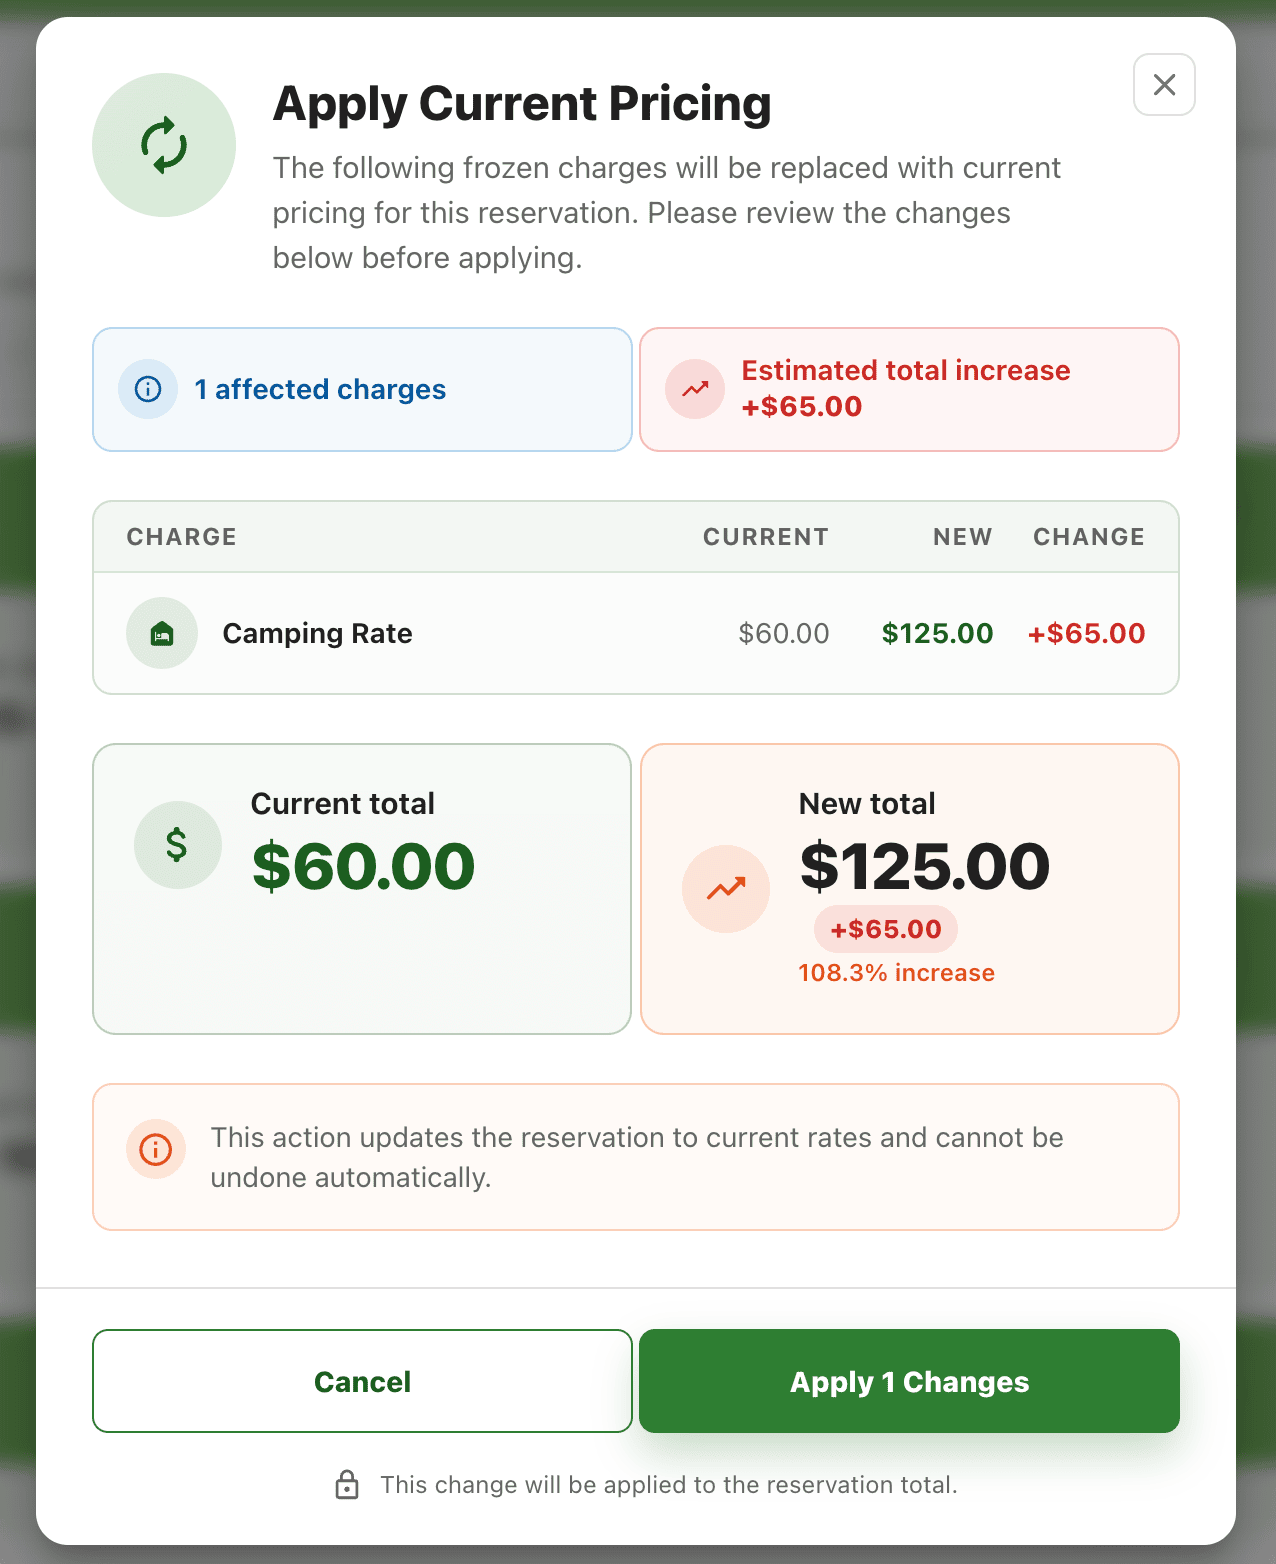
Click the Apply Current Pricing button in the banner. A confirmation dialog appears showing:
- The number of affected charges and the estimated total increase.
- A breakdown table listing each charge with its current value, new value, and the dollar change.
- A side-by-side summary of the current total versus the new total, including the percentage increase.
- A notice that this action cannot be undone automatically.
Click Apply Changes to confirm. All affected charges are updated to current pricing.
Apply a single charge
Click on any individual affected charge chip in the banner. The same confirmation dialog opens, but scoped to only that one charge. This lets you selectively update specific line items while leaving others frozen.
Note
Applying current pricing updates the reservation total permanently. If you need to revert, you will need to manually adjust the charge back to the previous amount.
When and Why to Use This Feature
Example 1: Rate increase after a reservation was saved
A guest booked a seasonal lot at $60.00 per night. Your campground later raised the nightly rate to $125.00. With the Frozen Pricing Banner enabled, staff see the discrepancy immediately when opening the reservation and can apply the updated rate with one click — rather than discovering the mismatch at billing time.Example 2: Partial pricing update
A reservation has three affected charges but only the camping rate has changed significantly. You can click the Camping Rate chip to update just that charge and leave the others unchanged.