Installing Dymo Label Printer
The following will walk you through on installing the Dymo web service in order to allow PitchCamp to communicate with your Dymo Label Printer.
- Tested with the Dymo Web service provided by the DYMO LabelWriters v8.6 software.
The following Dymo Label Printer have been tested with PitchCamp
- DYMO LabelWriter 450
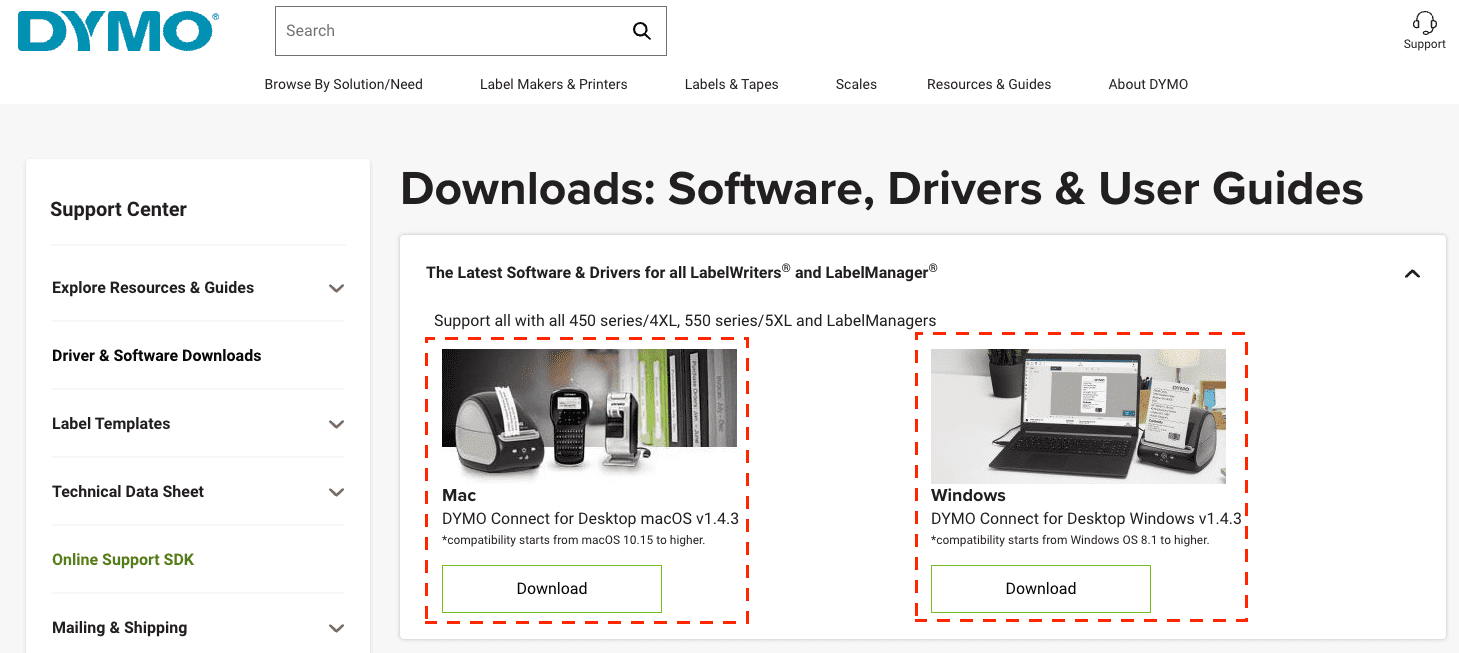
Go to the following website and download your driver/software. Click on Driver & Software Downloads + The Latest Software & Drivers for all LabelWriters: https://www.dymo.com/support?cfid=user-guide
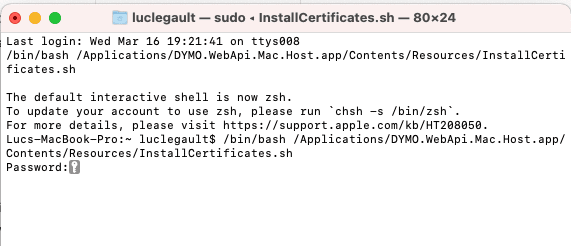
Then once the software is installed a console window prompting you for your password of your PC will be needed to complete the setup. This will install the necessary SSL certificates to communicate with your printer. And install the Dymo web service that allows PitchCamp to communicate with your printer.
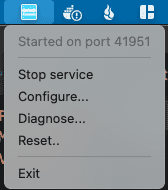
Once the password has been entered and the SSL certificates have been properly installed you should see the Dymo Connect Service icon in your taskbar.

Click on the Dymo menu and select Configure from the menu.
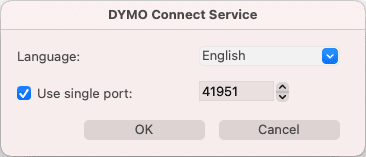
Ensure to check Use Single Port and that port number is at 41951. Select OK to save your configurations.
Then open the Dymo Connect application installed above.
If presented with a security warning.
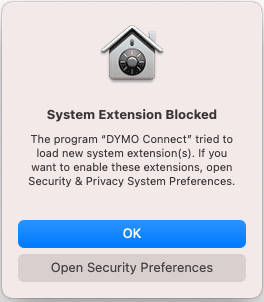
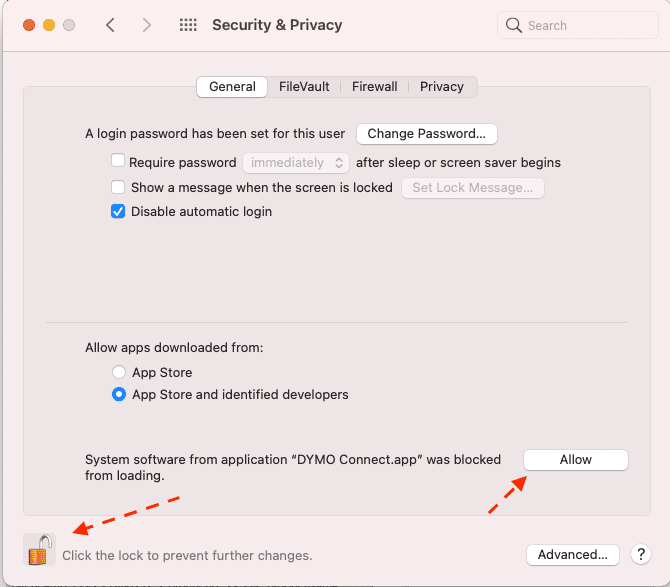
You will need to open the Security Preferences and Allow Dymo Connect full access in order to be able to print using PitchCamp**.**
Troubleshooting on newer macOS versions
On newer Macs and newer versions of macOS you may install DYMO Connect, have everything appear enabled, and still see this error in DYMO Diagnose:
Work through the steps below in order, and don't skip the restarts. If you've already reinstalled DYMO and still see this error, the real problem is usually that macOS doesn't fully trust the DYMO certificate. Reinstalling DYMO will not fix that. See step 6 for the fix that matters most.
1. Terminal password prompt
You may run the certificate script from Terminal using one of these commands:
or, with admin permission:
macOS may ask for a password while the script runs.
- Use your Mac login (admin) password, not a DYMO password.
- Nothing appears while you type. No dots, stars, or cursor movement. This is normal.
- Type the password anyway and press Enter.
- If Terminal returns to the normal prompt without a success message, the script may still have completed successfully.
2. Enable the DYMO driver extension
- Open System Settings.
- Go to General > Login Items & Extensions.
- Open Driver Extensions.
- Find DYMO.WebApi.Mac.Host Extensions.
- Turn on the toggle.
- Enter your Mac admin password if you're asked for it.
- Restart your Mac.
Note: On some Macs the toggle may appear to do nothing until the Mac is restarted.
3. Allow DYMO in Privacy & Security
- Open System Settings.
- Go to Privacy & Security.
- Scroll to the bottom.
- Look for any message saying DYMO system software, DYMO.WebApi.Mac.Host, or a DYMO extension was blocked.
- Click Allow if the option appears.
- Enter your Mac admin password if you're asked for it.
- Restart your Mac.
4. Allow Local Network access
- Open System Settings.
- Go to Privacy & Security > Local Network.
- Turn on anything related to DYMO, DYMO Connect, or DYMO.WebApi.Mac.Host.
- This lets your browser and PitchCamp talk to the DYMO web service running on your own computer.
5. Add DYMO WebApi Mac Host to startup
After rebooting, the DYMO icon may not appear automatically in the macOS menu bar. If this happens, the DYMO WebApi Mac Host may not be launching on startup.
First, launch it by hand:
- Open Finder.
- Go to Applications.
- Find DYMO.WebApi.Mac.Host.app.
- Double-click it.
- Confirm the DYMO icon appears in the top menu bar.
Then add it to startup so it opens on its own:
- Open System Settings.
- Go to General > Login Items & Extensions.
- Under Open at Login, click the + button.
- Select /Applications/DYMO.WebApi.Mac.Host.app.
- Under Allow in the Background, also enable any DYMO related items.
- Restart your Mac and confirm the DYMO icon appears automatically.
6. Fix net__http_ssl_connection_failed by trusting the DYMO certificate
This is the most important fix. If DYMO Diagnose shows net__http_ssl_connection_failed, the DYMO service may be running fine, but macOS may not trust the DYMO local SSL certificate. When that happens, reinstalling DYMO will not help. You need to trust the certificate by hand.
Optional test commands (for advanced users)
You can confirm the problem in Terminal. Run:
If this connects but shows:
then run it again without the -k option:
If that fails with:
then the DYMO Root CA certificate needs to be trusted manually.
Trust the certificate in Keychain Access
- Open Keychain Access (find it with Spotlight, or in Applications > Utilities).
- In the left sidebar, check both login and System.
- Search for DYMO.
- Find DYMO Root CA (for localhost), or the DYMO root certificate.
- Double-click the certificate to open it.
- At the top of the certificate window, find the Trust section. The Trust section is collapsed by default, so you must click it to expand it.
- Set When using this certificate to Always Trust.
- Close the certificate window.
- Enter your Mac admin password if you're asked for it.
- Restart your Mac.
Test again after the restart
Run:
The important success line to look for is:
An HTTP 404 response is fine for this test. It still means the DYMO HTTPS service responded and the certificate was trusted. The important part is that the SSL certificate error is gone.
7. Restart the DYMO service after changes
Optional commands (for advanced users) to restart the DYMO service after making the changes above:
Then run DYMO Diagnose again, or try printing from PitchCamp.