Creating a New Reservation
To create a new reservation select the New Reservation from the reservation grid menu. Once in the new reservation workflow you will be presented with a stepped approach where you will be asked to select the various elements of the reservation.
Tip
You can also use the timeline to add a new reservation. For steps on how to add a new reservation from the timeline visit this page: Creating a New Reservation From the Timeline
Step 1: Dates
The dates step has been redesigned to make picking arrival and departure faster, especially for the common cases your staff handles every day. It combines a large interactive calendar, smart time pickers, quick shortcuts, and a live availability counter on a single screen.
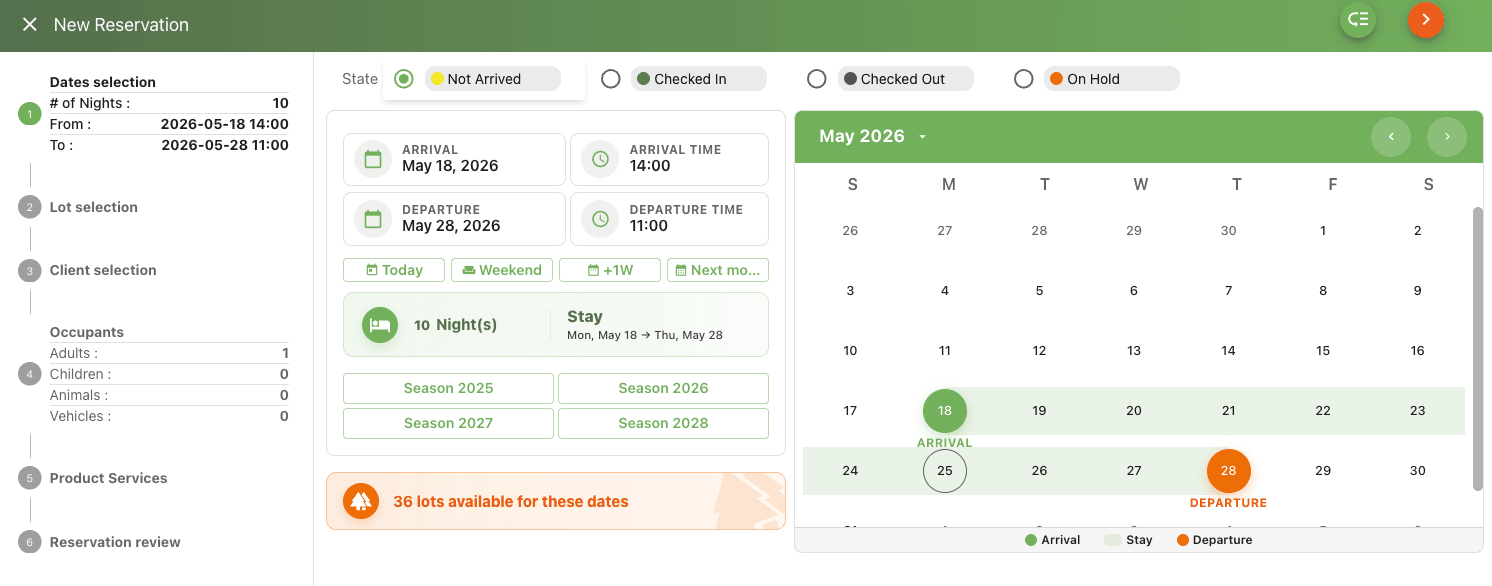
Picking dates on the calendar
The calendar supports two interaction modes:
- Click arrival, then click departure to set the range. As you hover after the first click, a ghost preview shows the range that will be selected.
- Drag across the calendar to set the range in one motion.
Use the month and year navigation at the top of the calendar to move between months.
Quick shortcuts
Below the calendar, a row of buttons sets common ranges in a single click:
- Today: arrives today.
- Weekend: the upcoming Friday to Sunday weekend.
- +1W: a one-week stay starting from the currently selected arrival (or today if no arrival is set).
- Next Month: a one-month stay starting from the next billing-month boundary. This honours your campground's monthly billing setting (day-based or calendar-based), so it lines up with how your monthly rates are calculated.
Arrival and departure times
Arrival and departure times appear as cards next to the calendar. Each card has a reset button (small X icon) that restores the time to your campground's seasonal default. The reset button only appears when the time differs from the default, so it's easy to see whether you've customized either side.
Reservation state
The reservation state (e.g. Not Arrived, Checked In, On Hold) is selected on the same step. The state controls how the reservation behaves once saved; see the state descriptions in Editing an Existing Reservation for the full list.
Live availability counter
Below the calendar, a counter shows how many lots are available for the selected range, along with a relative timestamp ("updated N minutes ago"). The number refreshes every 30 seconds so it stays current as other bookings come in while you work.
Once dates, times, and state are set you will be able to advance to the next step by selecting the right chevron or clicking on step 2 from the list.
Step 2: Lot
The lot selection step uses a split map and list panel so staff can scan both views at once or focus on whichever view suits the situation best.
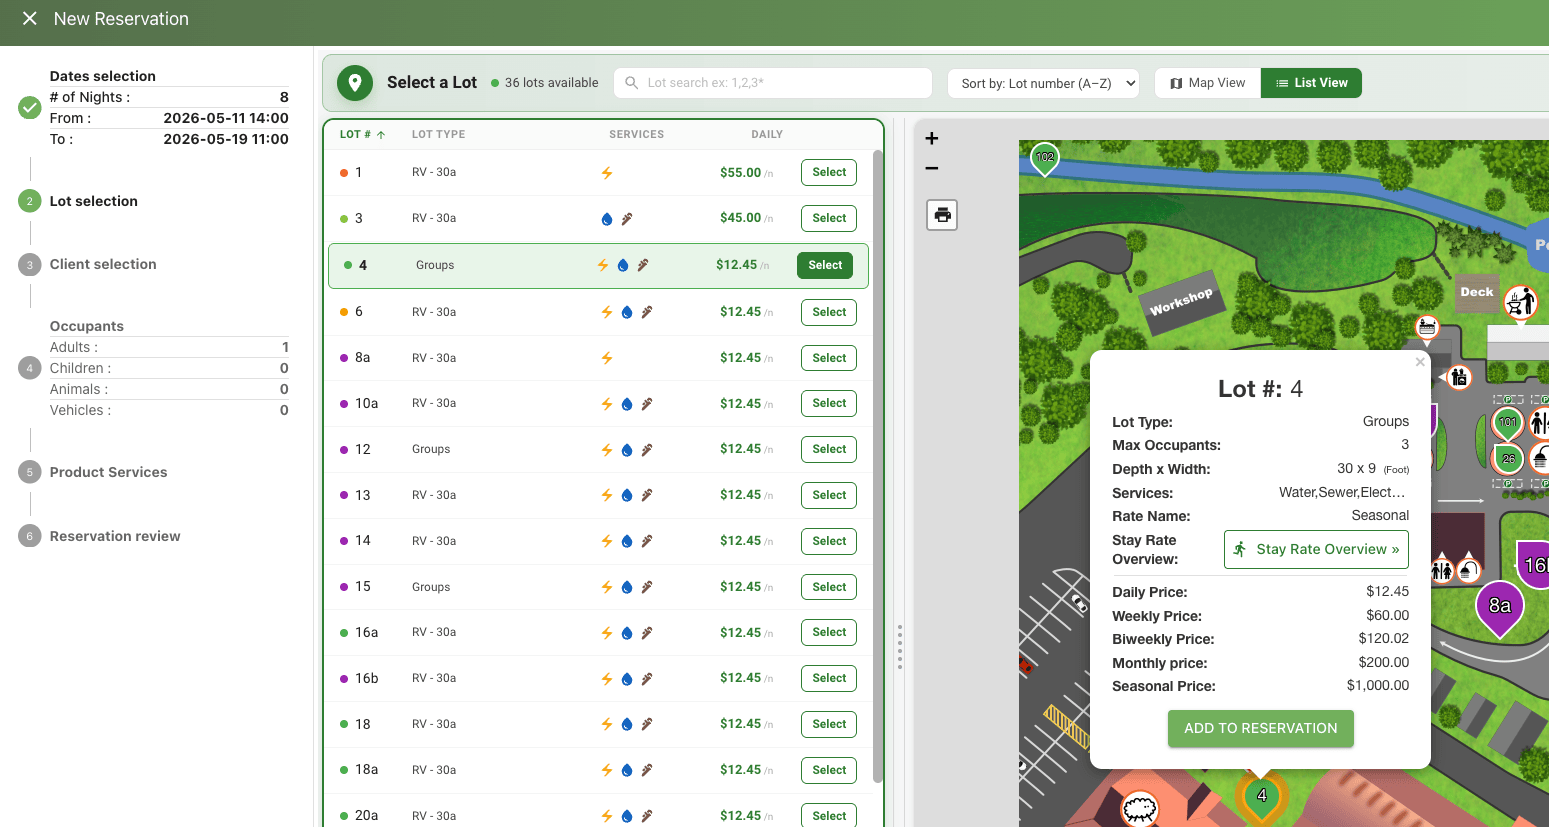
Resize the split
A draggable divider sits between the map (left) and the list (right). Drag it to give more room to one side or the other. Your split percentage is remembered per user, so the layout you prefer follows you across reservations and sessions.
- Drag the divider all the way to the right for a full map view.
- Drag it all the way to the left for a full list view.
- Park it anywhere in between for a split that suits the situation.
On mobile or narrow windows (under 960px), the divider auto-hides and the UI becomes a full-width map or full-width list with a quick toggle button.
The lot list
The list shows every lot that is available for the date range chosen in Step 1, with the following sortable columns:
- Lot #
- Type
- Amp / Depth / Amenities (responsive: more columns appear as the list panel widens)
- Daily price (always visible)
- Weekly / Monthly / Seasonal prices (appear progressively as the list panel widens)
Click a column header to sort by that column; click again to reverse the direction. The arrow indicator next to the column name shows the current sort.
The list is virtualized so scrolling through hundreds of lots stays smooth on busy campgrounds.
The map
The map shows pins for every available lot. Click a pin to see the lot's details and click Add to Reservation from the popup menu. Pins on lots that don't fit the date range are dimmed.
Picking the lot
You can pick the lot from either the map or the list:
- From the map: click the pin, then click Add to Reservation in the popup.
- From the list: click the row.
Once a lot is selected you will be advanced automatically to the next step.
Step 3: Client
Select your client from the grid.
Once a client is selected from the grid you will be able to advance to the next step by selecting the right chevron or clicking on step 4 from the list.
Step 4: Occupants
Enter the number of occupants.
Note: in order to be able to advance to the next step you will need to have at least one adult selected.
Step 5: Add-ons
Select the add-ons to apply.
In this step you don't need to select any addons in order to advance to the next step.
Step 6: Review
Review your reservation.
Once satisfied with your reservation(s) select the
Savebutton to create your new reservation(s).
- Your new reservation(s) will be displayed in the reservation edit panel where you will be able to make additional changes and add payments.
- If a reservation conflict was detected when creating your reservation(s) you will be brought to the reservation grid and presented with a warning message.
Duplicating a Reservation
Once you have a complete reservation you will be able to duplicate the reservation by selecting Duplicate icon located at the top right corner of the reservation review panel.
When duplicating a reservation the entire reservation is duplicated except for the lot number. You will need to select a different lot number by advancing to step 2.
Creating Group Reservations
To create a group reservations follow the steps listed here: Creating Group Reservations
Removing a Reservation
If you which you can remove a reservation review element by clicking on the Remove icon located in the top right corner of the reservation review panel.
Adding a New Reservation
Once you have completed your first reservation review you will be able to add a second reservation by selecting the Add New reservation icon located in the bottom right of the reservation review panels.